In this tutorial, you’ll learn how to change upload limit of WordPress hosted on Azure VM (Virtual Machine). Recently, after hosting a WordPress website on Azure Virtual Machine (Linux), I was trying to upload media and files to the WordPress site. But due to default configuration there was a maximum upload limit of 2MB.
As the WordPress was hosted on Azure Virtual Machine, I couldn’t find the FTP access for the site, the one I used to connect to Virtual Machine through FTP didn’t have WordPress folder in it.
Going through some blogs I found one solution but that only worked on Azure Websites and not on WordPress hosted on Azure Virtual Machine.
Let me give you a head’s up on what I tried. (remember this works for Azure Apps/ Websites)
I created a file called .user.ini at the site root (using WordPress Plugin named WP File Manager) and added the following:
upload_max_filesize = 64M
Even after restarting the Virtual Machine, it is still not working. Then I tried editing .htaccess file.
Method 1: change upload limit of WordPress hosted on Azure VM by editing .htaccess
Finally, I was able to change upload limit of WordPress hosted on Azure VM, here are the things I did in steps:
- Install WP File Manager Plugin (Free version works), I did this because I couldn’t access WordPress on Ubuntu VM via FTP.
- Edit .htaccess file and add these lines at the end
php_value upload_max_filesize 64M
php_value post_max_size 64M
php_value max_execution_time 300
php_value max_input_time 300
- Restart Virtual Machine (Optional).
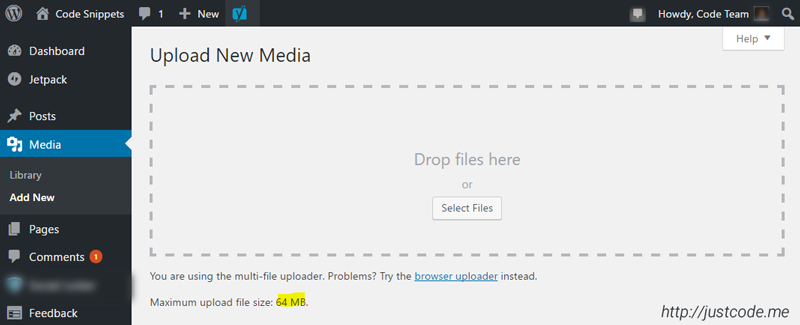
To check, go to Media > Add New and on the same page you’ll see Maximum upload file size is changed to your given size.
Method 2: Editing WordPress Config File
If the above method fails, you can try this trick, here you’ll have to edit “wp-config.php” file, located in the root directory.
Open up the file, and at towards the bottom add the line:
Open up the file, and at towards the bottom add the line:
define('WP_MEMORY_LIMIT', '64M');
Then upload this file back to the server.
The navigate to your active theme folder in “wp-content” and drag your “functions.php” file to your hard drive so you can edit it. Open it up, and at the very top, insert:
@ini_set( 'upload_max_size' , '64M' );
@ini_set( 'post_max_size', '64M');
@ini_set( 'max_execution_time', '300' );
This may be able to edit your server’s php.ini file at runtime. Historically, this is the most effective solution. But on some older set-ups or shared servers, this can sometimes be effective. once again, clear your browser and site cache, and visit Media -> Add New to see if your new limit has taken effect.
Bonus : How to host website on IIS Web Server in Azure Virtual Machine
https://www.youtube.com/watch?v=5qqTS2oBHDw
play youtube
play youtube
xvideos
xporn
Phim sex
What Vaccines Do Dogs Need Annually
Wordle Jan 19
What Is Threshold Amount
My Pet Frame
Box Score For World Series
Louisville Women S Basketball Roster
Apple Savings Account Cons
Cso Criminal Search Bc
What Were Kleenex Tissues Originally Used For
Mens All Birds
Is Better Call Saul Over
Waitrose Warwick Way
Usd To Rm
How Much Is A Fitbit
Civil Liabilities Definition
What Is A Fast Internet Download Speedhulk Smash Birthday Cake
Waitrose Warwick Way
Rabies Vector Species
Gonzo Move
What Is The Sherman Act
Great article. But the File Manager refused to save the edited .htaccess file! No explanation given. I now have a big stack of solutions to transfer a WordPress website to AZURE, but each one of them fails at some point.
I have updated the article with yet another method to change
maximum_upload_limitof WordPress by editing wp_config.php and function.php. If you’re still unable to edit and save these files, then there might be some permission issue with either your server, or your WordPress plugin.Thank you so much for this. I am on day three of trying to figure it out. Lawrence: I had to use the other file manager plugin with the blue WordPress logo on the folder for it to work.